In this article, we discuss how to start staking your Akash $AKT and benefit from ~57% APY passive-income potential using the Akash Command-Line-Interface (CLI).
Article Series (6 of 7)
This is the 6th article in our series relating to the purchasing, trading, and staking of Akash ($AKT). If you are just discovering this article series, you may want to review our previous articles to understand the complete steps;
- How To Purchase Cryptocurrency (Via Bankdrafts) using Coinbase.
- How To Purchase Akash Tokens ($AKT) Using Gate.io.
- How To Stake Akash ($AKT) via Keplr.
- How To Stake Akash ($AKT) via Cosmostation Web Wallet.
- How To Stake Akash ($AKT) via Cosmostation Mobile App.
- How to Stake Akash ($AKT) via the Akash Command-Line-Interface (CLI).
- Potential Earnings With Staking: What To Expect?
If you have already purchased your Akash ($AKT) and want to know how to create a personal wallet, using the Akash CLI, and begin staking your AKT then this article is for you.
Akash Command-Line-Interface (CLI)
If you are a developer, chances are you have already played with the Akash software, and you probably already know that using the Akash (CLI) provides you with access to your Akash wallet. Using the Akash (CLI) you have complete control over your wallet allowing you to create, import, export, send transactions, and receive transactions using your Akash Wallet.
This guide is meant specifically for those of us that are not developers!
In this article, we are going to introduce you to a very powerful feature of the Akash software known as the Command-Line-Interface or “CLI“. We will dive into the CLI as it relates to the end-user and the management of your Akash Wallet.
One of the great features of the Akash software is that it is available in pre-compiled binaries for Windows, Linux (various flavors), Apple's OSX, and the source code is also available for anyone who prefers to compile the software for themselves. The software is designed with a Command-Line-Interface (CLI), in other words, there is no graphical user front-end.
As is, the Akash CLI opens up a world of possibilities for anyone looking for an easy way to access the FULL functionality of Akash.
In the sections to follow, we will discuss;
- installing and testing the Akash CLI on Windows
- installing and testing the Akash CLI on Linux (ubuntu)
We will then conclude with a walk-thru of using the Akash CLI to create a wallet and use funds ($AKT), sent to that wallet, to stake Akash ($AKT) to a selected Validator on the Akash network.
Let's get started with Windows…
Installing Akash on Windows
Installing Akash for windows is a very easy process. As long as you are familiar with Windows File Explorer, zip files, and the Command Prompt then you have all the knowledge needed to use the Akash CLI.
Let's start by installing Akash onto your local Windows machine. (For these steps, we assume you have some version of Windows 10);
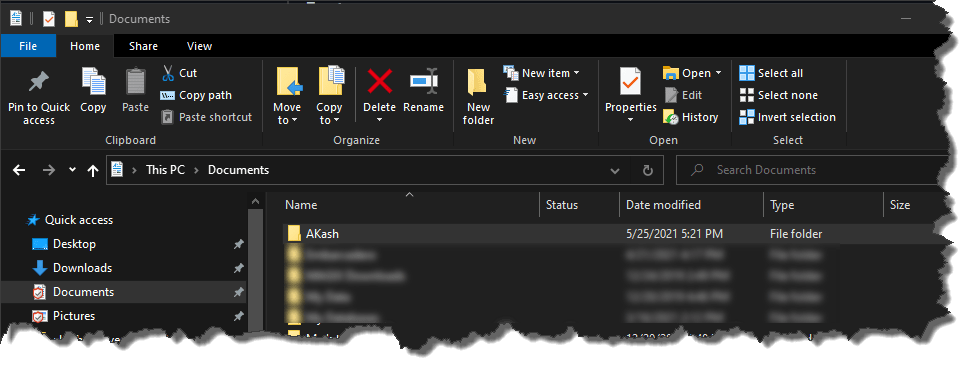
- Using Windows File Explorer, open up your Documents and create an Akash folder using the New Folder option. Once created your results should look similar to this image (shown below)
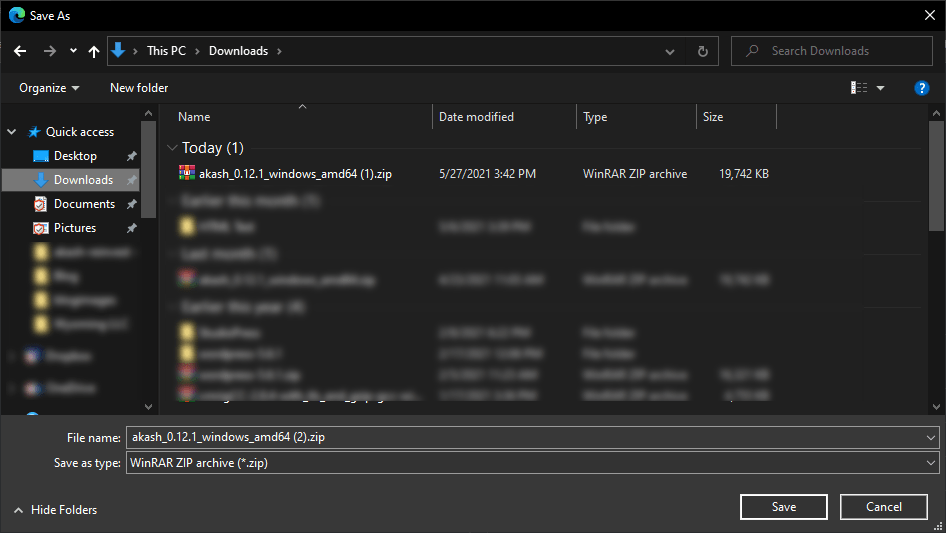
- Next, we will go to the Akash Github repository to download the “Latest” version of Akash for Windows. As of this writing, the current version is v0.12.1. Click HERE to download the software then perform a “Save As” to save the file to your downloads folder.
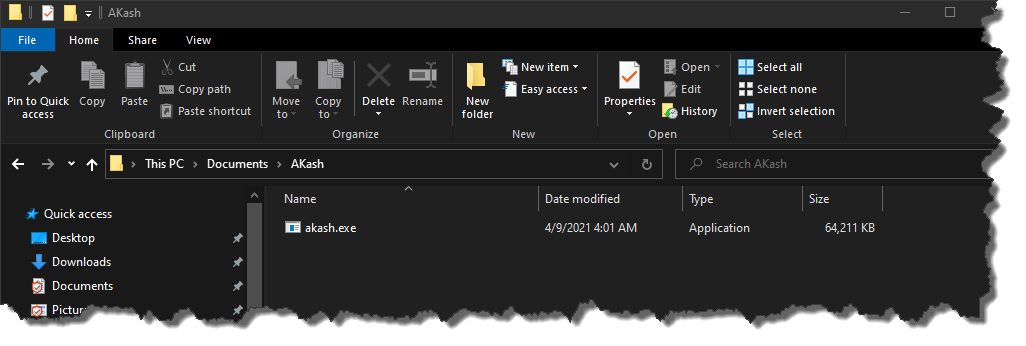
- Using Windows File Explorer, open the downloaded ZIP file and extract the akash.exe into the Documents\Akash folder that you created in Step 1. The contents of your Document\Akash folder should now look like the following;
- Now let's test your installation to ensure everything is working as expected. Type
cmdinto the location bar as shown below, then hit “Enter”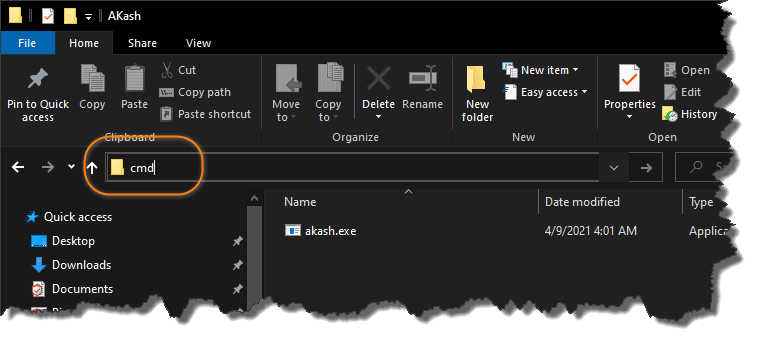
- Now you should have a Windows Command Prompt window open up that looks similar to the following;
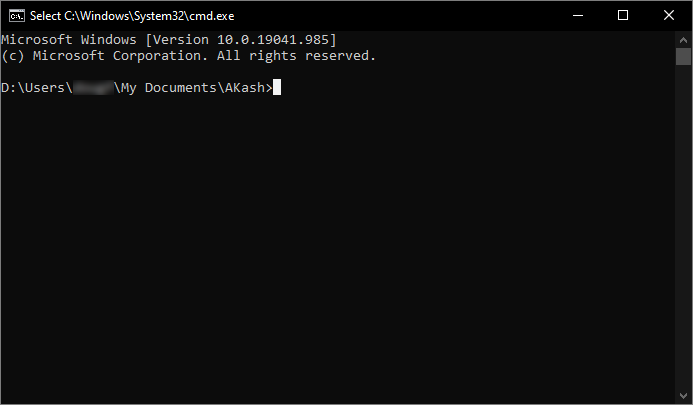
- In this Command Window type in the following
akash.exe versionand hit “Enter”. You should see results similar to the following;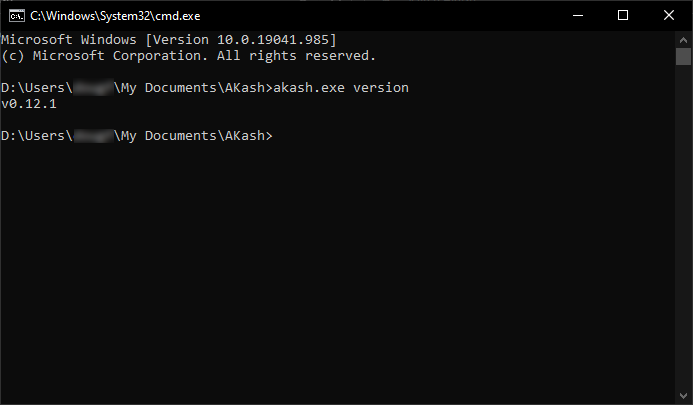
If your results are different, for instance, you see a different version or no version at all. Then go back to Step 1 and start over to ensure that you followed all the steps as outlined.
If your version displayed is the same as ours (v0.12.0), then you have completed the installation of the Akash software for Windows!
Congratulations – The installation and testing of Akash for Windows is now completed!
Installing Akash on Linux (ubuntu)
Fortunately, for Linux users, installing the Akash software onto your local Linux workstation is much easier due to the use of the GoDownloader software on the Akash GitHub site. In the following steps, we will walk-thru installing Akash on your local Linux machine and testing your installation to ensure you are ready to begin staking Akash ($AKT) via the Akash Command-Line-Interface (CLI).
For our examples, we will use Ubuntu 18.04. However, your Linux version may be different. The steps outlined will work the same regardless.
The following are the steps you need to get Akash installed for Linux;
- Open up a terminal window using your favorite terminal program (gnome-terminal, putty, etc…). We're using putty below;
- Next, we are going to create an Environment Variable to hold the version of the Akash software that we want to install. Enter the following into you terminal window to set and check your environment variable setting;
AKASH_VERSION=0.12.0

echo $AKASH_VERSION
If everything worked as expected, you should see something similar in your terminal window;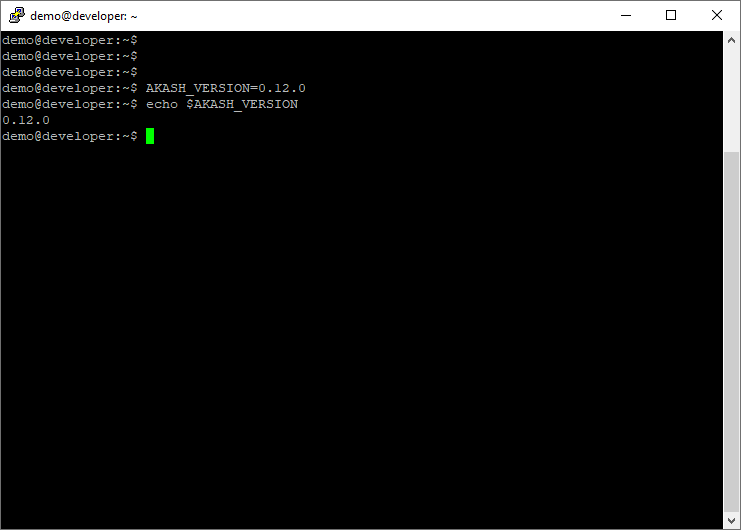
- Now that you have your Akash Version environment variable the next step is to simply run the GoDownloader installation using this command;
curl https://raw.githubusercontent.com/ovrclk/akash/master/godownloader.sh | sh -s -- "v$AKASH_VERSION"
Once that command runs, it will connect to the Akash Github, download the latest Akash software, and install it onto your Linux machine. (see image below)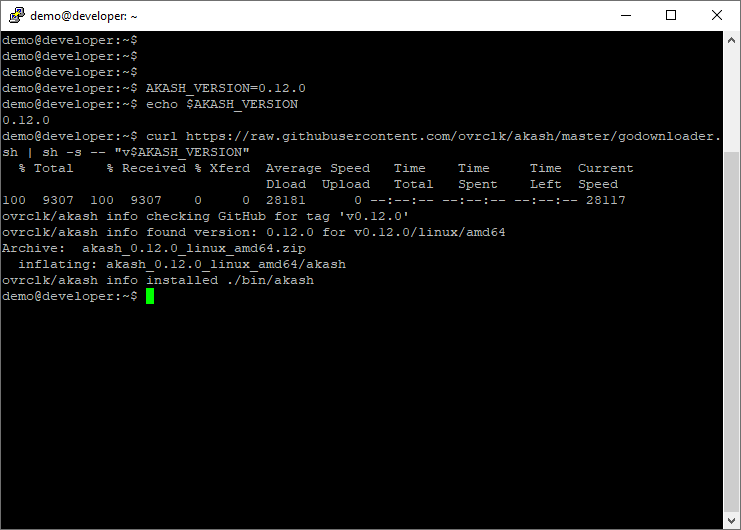
- Now we can check the installation of Akash by performing the following commands;
ls -al ~/bin

cd bin
If your Akash software installed correctly, your display should resemble the following;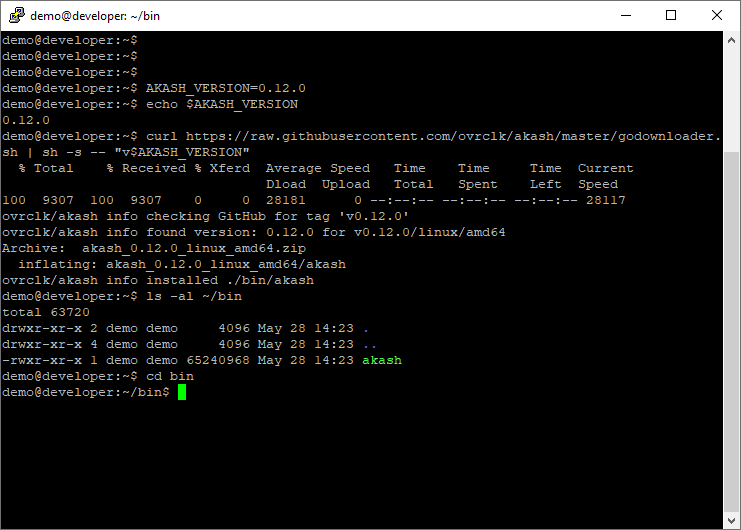
- Now we can test your installation to ensure everything is working as expected. Enter the following command;
./akash version
Now hit “Enter” and compare your results to the screen image below;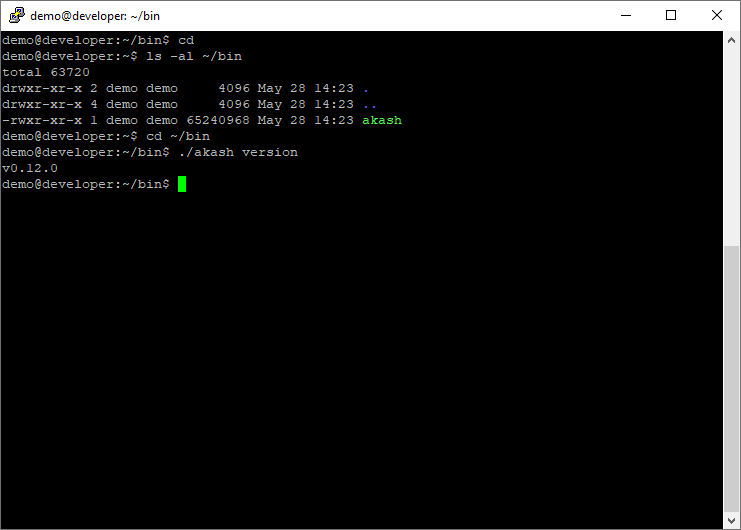
If your results are different, for instance, you see a different version or no version at all. Then go back to Step 1 (for Linux) and start over to ensure that you followed all the steps as outlined.
If your version displayed is the same as ours (v0.12.0), then you have completed the installation of the Akash software for Linux!
Congratulations – The installation and testing of Akash for Linux is now completed!
Akash CLI Command (Windows and Linux)
This is where the fun begins!
Regardless of whether you are running the Akash CLI on Windows, Linux or any of the other supported OS's. The Akash CLI works the same, hence, once you learn how to use the Akash CLI then you can use it on any machine that you wish to install onto. The only difference is in how you reference the Akash command – on windows use;
akash.exe
While with Linux use;
./akash
For the remainder of our examples, we are going to be using the Linux installation. However, the Akash Commands and Command Parameters are the same.
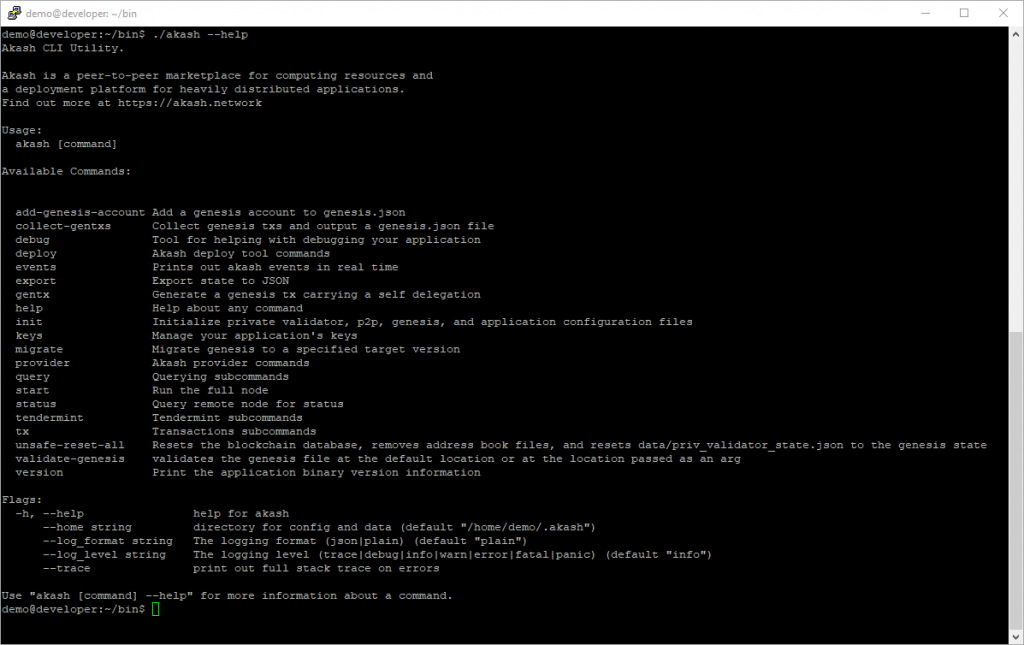
The Akash CLI comes with an extensive list of command options. You can get helpful information about the command/options and how to use them by entering the following into your terminal;
./akash --help
This will produce a nicely formatted listing of the commands available via the Akash CLI.
Let's go ahead and start working with a few of these commands by creating an Akash Wallet on your local machine.
Creating an Akash Wallet for your $AKT via the Akash (CLI)
For this exercise, we are going to assume that you do not have an Akash wallet yet. However, if you do already have an Akash wallet (Keplr or Cosmostation) we will cover how to create a copy of that wallet onto your local machine too.
So let's start with an example of how to create an Akash wallet. The Akash command we are going to use is;
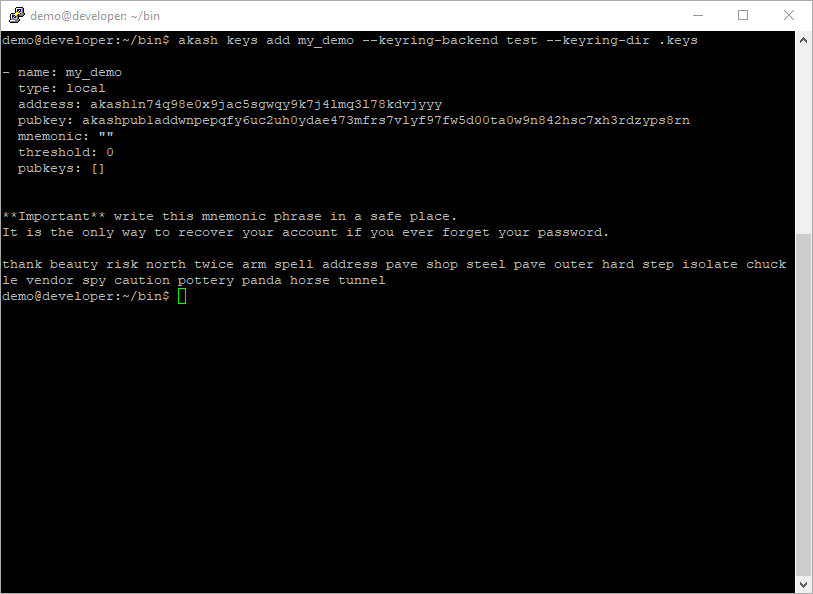
./akash keys add my_demo --keyring-backend test --keyring-dir .keys
Executing the above command will create a local wallet with the keys stored on your local machine;
Once you have created your wallet, take a moment to write down the information presented.
- NAME: This is the name you have given your wallet. This name can be any name you choose.
- ADDRESS: This is your Akash wallet address. This is what you provide to anyone wishing to send $AKT to you.
- MNEMONIC PRASE: This is the most important information. Write this down, double-check it, and put the information in a safe place. If you ever lose your wallet, you can use this mnemonic phrase to recover your wallet.
So now, let's break down the command we used and discuss the various components;
./akash keys add my_demo --keyring-backend test --keyring-dir .keys
- ./akash keys add – This should be pretty self-explanatory. We are adding a new key to our local machine using this command
- [my_demo] – This is your wallet name, in our example we used my_demo. You can use any name for your wallet that makes sense to you
- – -keyring-backend – This allows you to select how your keys are stored. There are 3 options that are available;
- os – is the safest storage method. Using this method you supply a password for your wallet and using your machine's OS information your wallet keys are securely cryptographically hashed. The keys cannot be copied to any other machine
- file – is also a safe method. You supply a password for your wallet and your keys are cryptographically hashed. While they are hashed, they CAN be moved to other machines and still work
- test – this is the least secure. You are not asked to supply any password and your keys are not cryptographically hashed.
(if you use this method, ensure that nobody has access to your local machine other than you)
- – -keyring-dir – This is the directory where you want your keys stored. In our example, we are storing them in a subfolder in the Akash folder. If omitted, the default ‘home' directory will be used
Probably, about now you are asking yourself – “Why if using – -keyring-backend test is so insecure does the examples use it?”
We used – -keyring-backend test in our example because we have another article in the works where we are going to show you “How to use the Akash CLI to put your Re-Staking on Auto-Pilot“. In that article, we will continue to use our my_demo wallet, and to automate the Staking process we need to have a wallet without a password. If you are not interested in auto-staking, then you can use either “os” or “file” for your wallet's security.
Existing Wallet? (Keplr or Cosmostation)
Earlier we mentioned, if you already have a wallet (Keplr or Cosmostation) and you wanted to add that wallet to your local machine, we would explain how to do that. It's really very simple, you are going to use the same command, but you will append the – -recover parameter.
So for those that already have wallets (Keplr or Cosmostation), and want to add those to their local machine, use the following command;
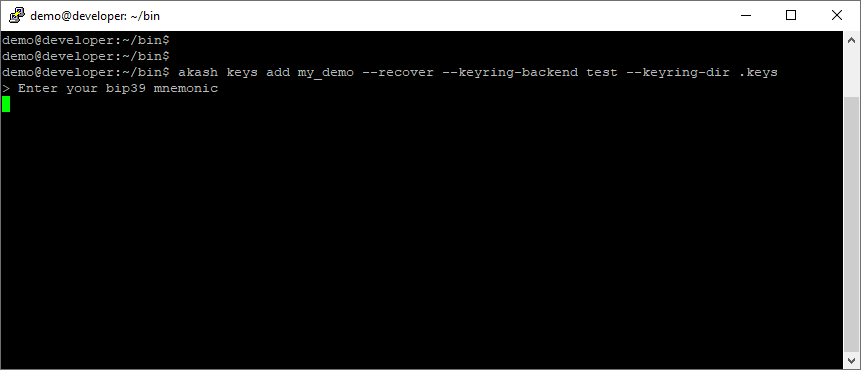
./akash keys add my_demo --recover --keyring-backend test --keyring-dir .keys
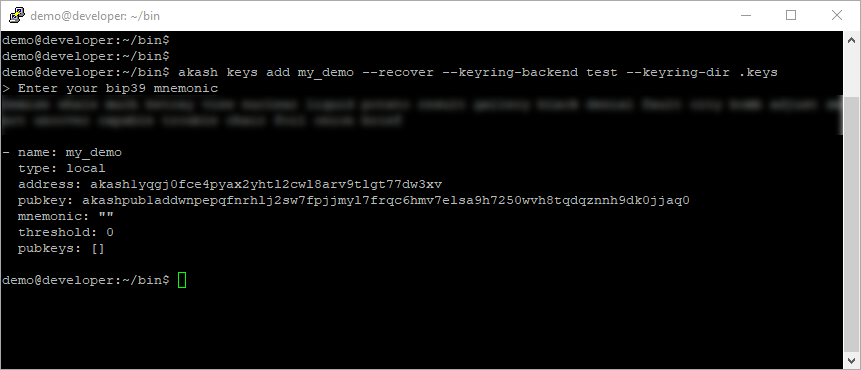
If you use the – -recover option, you will be prompted to enter your 24-word mnemonic for your wallet.
Once you enter your mnemonic, your wallet will be created (recovered) on to your local machine.
Stake Akash ($AKT) via the Akash Command-Line-Interface (CLI)
It may seem like it took us a while to get here. But here we are!
In this section we are going to show you how to send AKT to your new wallet, check your wallet balance, and stake your Akash ($AKT) using the Command-Line-Interface (CLI).
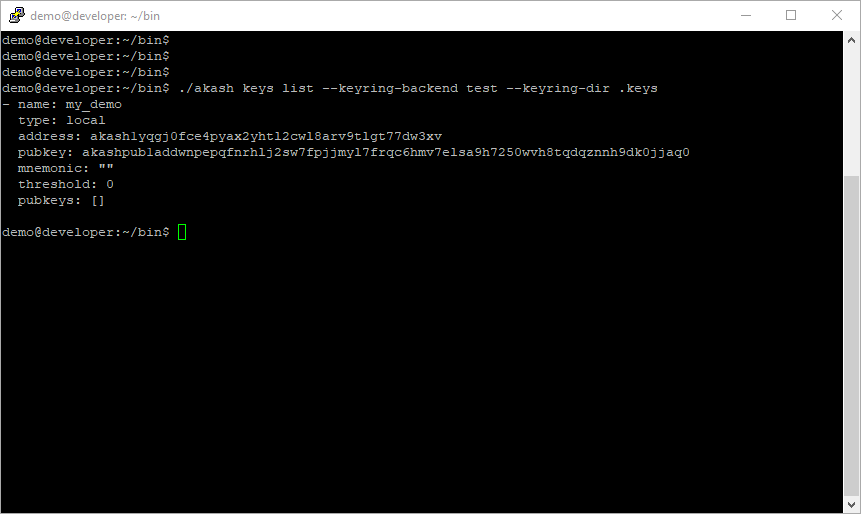
When you created your wallet, you were presented with your wallet's address. Don't worry if you forgot to write it down, it is easy to access your wallet information at any time. Just use the following command to get your wallet's address;
./akash keys list --keyring-backend test --keyring-dir .keys
You'll receive an output similar to the following;
Now that you have your wallet address, you are going to want to send some ($AKT) to your wallet. It doesn't matter how much you send to your wallet, there is no set amount. However, for our examples, we are going to send 10 AKT to our my_demo wallet to work with.
Checking your Wallet's AKT Balance
Checking your wallet's balance requires some additional information that we have not used yet.
For simplicity's sake, we are going to add some additional information to our ENVIRONMENT VARIABLES for use in the remainder of our commands. Run the following commands substituting your specific information as defined below;
AKASH_CHAIN_ID=akashnet-2

AKASH_RPC_NODE=http://135.181.60.250:26657

AKASH_WALLET=[your_wallet_name]

AKASH_ADDRESS=[your_address]
Let's breakdown the information we just set;
- AKASH_CHAIN_ID – This is the chain-id of the Akash Network MAINNET
- AKASH_RPC_NODE – This is one of the preferred RPC nodes for issuing our transaction to the Akash Network
- AKASH_WALLET – This is the name you gave your wallet when it was created (examples name in my_demo)
- AKASH_ADDRESS – This is your wallets address
The up-to-date CHAIN_ID and RPC_NODE information is located in the Akash Github here – https://github.com/ovrclk/net/tree/master/mainnet
You can check the local environment variables you have set up on your machine by running the following command;
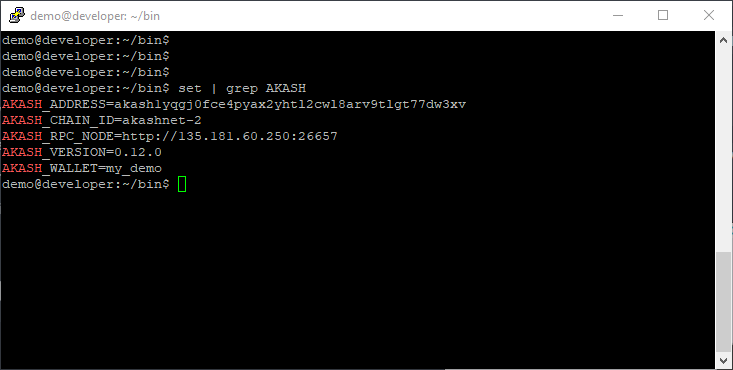
set | grep AKASH
This command will produce an output of all the local variables you have set up on your system with the name AKASH. Here's what our machine currently has based on the steps we have completed thus far;
Once you have sent AKT to your wallet, and you have set the above ENVIRONMENT VARIABLES, you can check your wallet's balance using the following command;
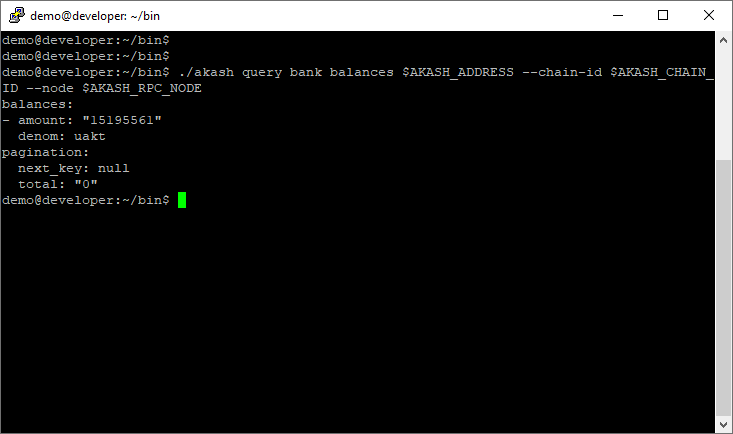
./akash query bank balances $AKASH_ADDRESS --chain-id $AKASH_CHAIN_ID --node $AKASH_RPC_NODE
The above command will return a response with output that shows the BALANCES you have in your wallet (example below)
You see in our example, we currently have 15.195561 AKT held in the my_demo wallet.
It's important to note – All wallet balances are shown in the CLI as INTEGER values. This is known as atomic representation. In our example we see the integer number (15195561) to convert that to the actual amount we count 6 digits from the right and place the decimal there – 15.195561 ($AKT) is the balance we have in our wallet.
Now that we have some $AKT in our wallet let's choose a Validator that we want to stake our Akash $AKT with.
Choosing a Staking Validator
There are many articles on Telegram, Discord, and the internet which are all about how to choose a Validator to Stake with. The choice is yours, and there is no right or wrong way to select a validator to stake your AKT with. All of the Akash Validators are very reputable and have proven to be very dependable.
We suggest that you use one of the Akash Explorers to view a list of Akash Validators and select one according to your own desire. The available Akash Explorers and their validator listing pages are listed here;
- MINTSCAN – Owned/operated by Cosmostation – https://www.mintscan.io/akash/validators
- THE BIG DIPPER – Owned/operated by Forbole – https://akash.bigdipper.live/validators
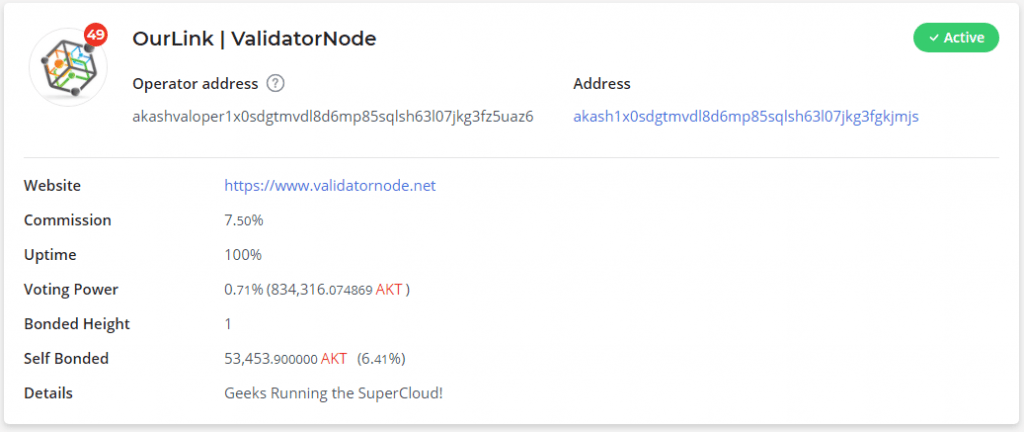
For our demonstration, we are going to choose the OurLink | ValidatorNode validator as shown from MINTSCAN.
Using the information we found on the MINTSCAN listing, we are going to copy the Operator Address for this validator to our clipboard.
akashvaloper1x0sdgtmvdl8d6mp85sqlsh63l07jkg3fz5uaz6
Operator (validator) addresses always are in the format as akashvaloper… Just be certain that you get the proper address for the validator that you have chosen. Using this information, we are going to create another environment variable as the following;
AKASH_VALIDATOR=akashvaloper1x0sdgtmvdl8d6mp85sqlsh63l07jkg3fz5uaz6
Once you have created this new environment variable, check that you have all the environment variables set as desired by running the following command;
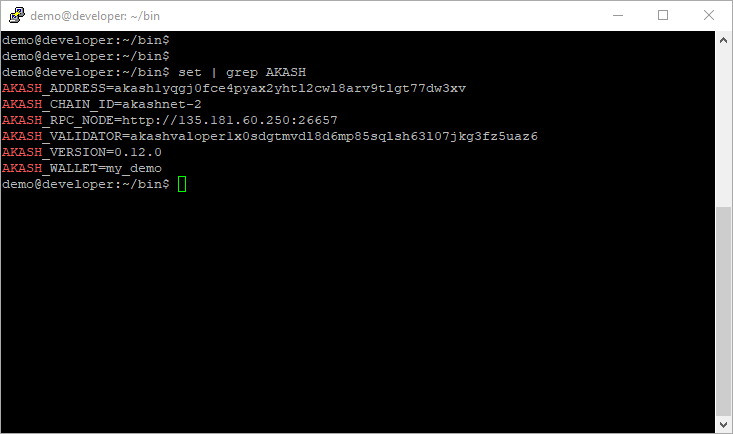
set | grep AKASH
Your output should be similar to the following;
If you have all these variables defined (adjusted for your system), then you are ready to begin staking.
Staking Your Akash $AKT using the CLI
In this final command, we are going to execute the action to stake Akash $AKT from our local wallet to the validator of our choice. Before we begin, there are two values in this command that we need to direct special attention to. Here are the two mentioned values;
- Amount to Stake – defined as the INTEGER value (atomic) for the amount we want to stake. (Our example – 10AKT, is defined as 10000000uakt)
- Fees to Pay – this is the INTEGER value (atomic) that we are willing to pay in fees for the transaction. (Our example – 0.000250AKT, is defined as 250uakt)
Each value is appended with the “uakt” representation of the AKT Units. Therefore, the command that we are going to use, in our example, for staking is;
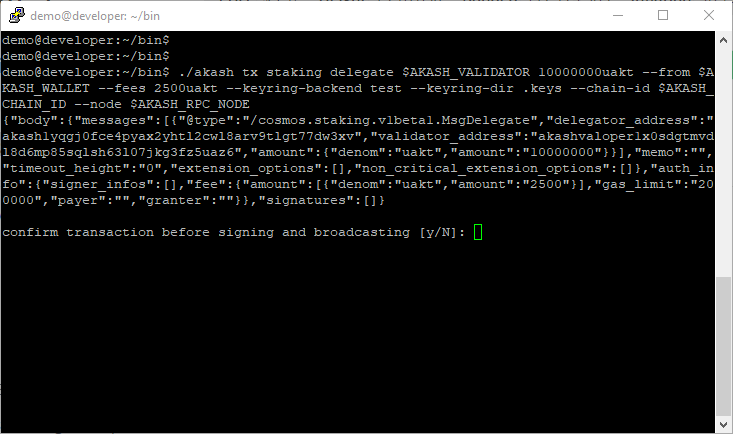
./akash tx staking delegate $AKASH_VALIDATOR 10000000uakt --from $AKASH_WALLET --fees 250uakt --keyring-backend test --keyring-dir .keys --chain-id $AKASH_CHAIN_ID --node $AKASH_RPC_NODE
If you examine the above command, you can see we are staking 10AKT (10000000uakt) and we are willing to pay 0.000250 AKT (250uakt) for the transaction fees. Now let's execute our command;
Before the transaction is submitted to be included in a block, and your Akash $AKT is staked with the validator, you will be asked to review and confirm your transaction. Once your review is complete, answer “Y” and hit “Enter”.
Congratulations, you have just completed the steps for How to Stake Akash ($AKT) via the Akash Command-Line-Interface (CLI)!
Checking your Staked Akash $AKT Balance
From time to time you may be interested in checking your staked Akash balance. You can complete this simply by using the following command;
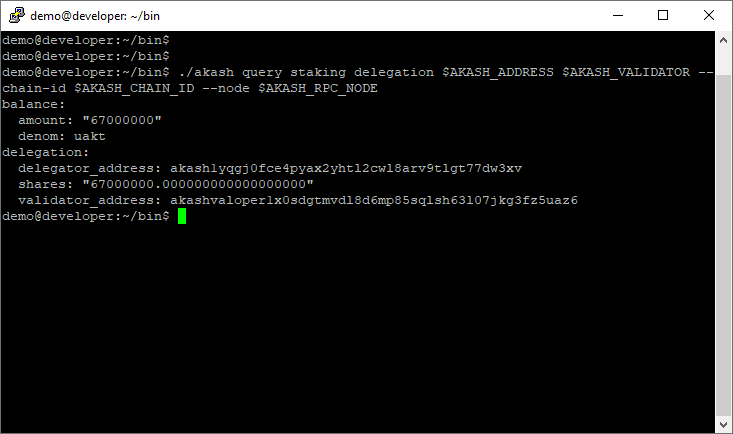
./akash query staking delegation $AKASH_ADDRESS $AKASH_VALIDATOR --chain-id $AKASH_CHAIN_ID --node $AKASH_RPC_NODE
Using this command you can see how much AKT you currently have staked (see image below).
Our currently staked balance, for our My_Demo wallet, is 67000000 which is 67.000000 AKT!
Summary
This concludes our tutorial on How to Stake Akash ($AKT) via the Akash Command-Line-Interface (CLI). We hope that you enjoyed this article and now have a better understanding of using the Akash CLI for your staking needs. Using the CLI, you can begin to enjoy the benefits of staking, along with the details and methods that you can use to compound your earnings via staking and increase your profit potential on staked Akash ($AKT) over 77% APY. This article is part of a series of articles that we are publishing to assist users of Akash ($AKT) and to help raise the awareness of Akash.
About Akash
The Akash Network (Akash) is a secure, transparent, and decentralized cloud computing marketplace that connects those who need computing resources (clients) with those that have the computing capacity to lease (providers).
Akash acts as a “super” cloud platform (supercloud) – providing a unified layer above all providers on the marketplace to present clients with a single cloud platform, regardless of which particular provider they may be using. Clients use Akash because of its cost advantage, usability, and flexibility to move between cloud providers and the performance benefits of global deployments. Providers use Akash because it allows them to earn profits from either dedicated or temporarily unused capacity.
About ValidatorNode
ValidatorNode is a fast-growing network of validator services. Having successfully partnered with the promising Akash Network we now have more than 10 million dollars worth of delegated crypto assets. Our innovative staking-as-a-service (SAAS) model allows retail investors/individuals to leverage their cryptocurrency tokens and earn profits. As a community-driven enterprise, we believe in mutual growth forging meaningful partnerships.
ValidatorNode “Delegator Partners” benefit from the highly secure and advanced and updated features of the ValidatorNode ecosystem. You make the maximum while we ensure seamless continuity and scalability of the validating and staking process.
Comment on Our Post